Stripe
What is Stripe?
Stripe is a payment service provider, which allows us to manage credit card payments in a secure manner. In addition, the “Stripe Connect” functionality allows us to manage the “platform” aspect of the payment, i.e. the distribution of payments between the platform (money going to the delivery cooperative) and the restaurant.
Due to the fact that the european cooperative is fund by contributions, we (CoopCycle) do not charge a commission on payments. Stripe takes a fee on each transaction (check the pricing for your country here).
Why Stripe?
Stripe has established itself as the “rolls-royce” of payment services. The service is reputed to be of excellent quality. It is possible to find cheaper services, but we believe the price is worth the candle. A known negative point about Stripe is that the (nice) Stripe admin interface is not always available in the user’s language.
What do you want to do?
- Set up a Coop Stripe account and connect it with my CoopCycle instance.
- Create a Restaurant Stripe account and connect it with the CoopCycle Restaurant account.
Setting up the Cooperative’s Stripe account
INFO: If you have any questions please contact us at dev@coopcycle.org.
Register and activate your Stripe account.
TIP: The following are standard account registration and activation steps. If you know what you’re doing, then register and activate the account by yourself and then skip to Connect your Stripe account to your CoopCycle instance.
- Register a Stripe account by following the steps on Stripe’s registration page.
- As soon as you’ve registered you will be re-directed to your Stripe dashboard.
- Before being able to activate your Stripe account you need to verify your email. Click on Verify your email and follow the steps there or check your e-mail account for a Verification email from Stripe and click on the link provided in the e-mail.

-
After verification you will be automatically re-directed to your dashboard and you should see a confirmation message and below Add business details to activate your account will be enabled:
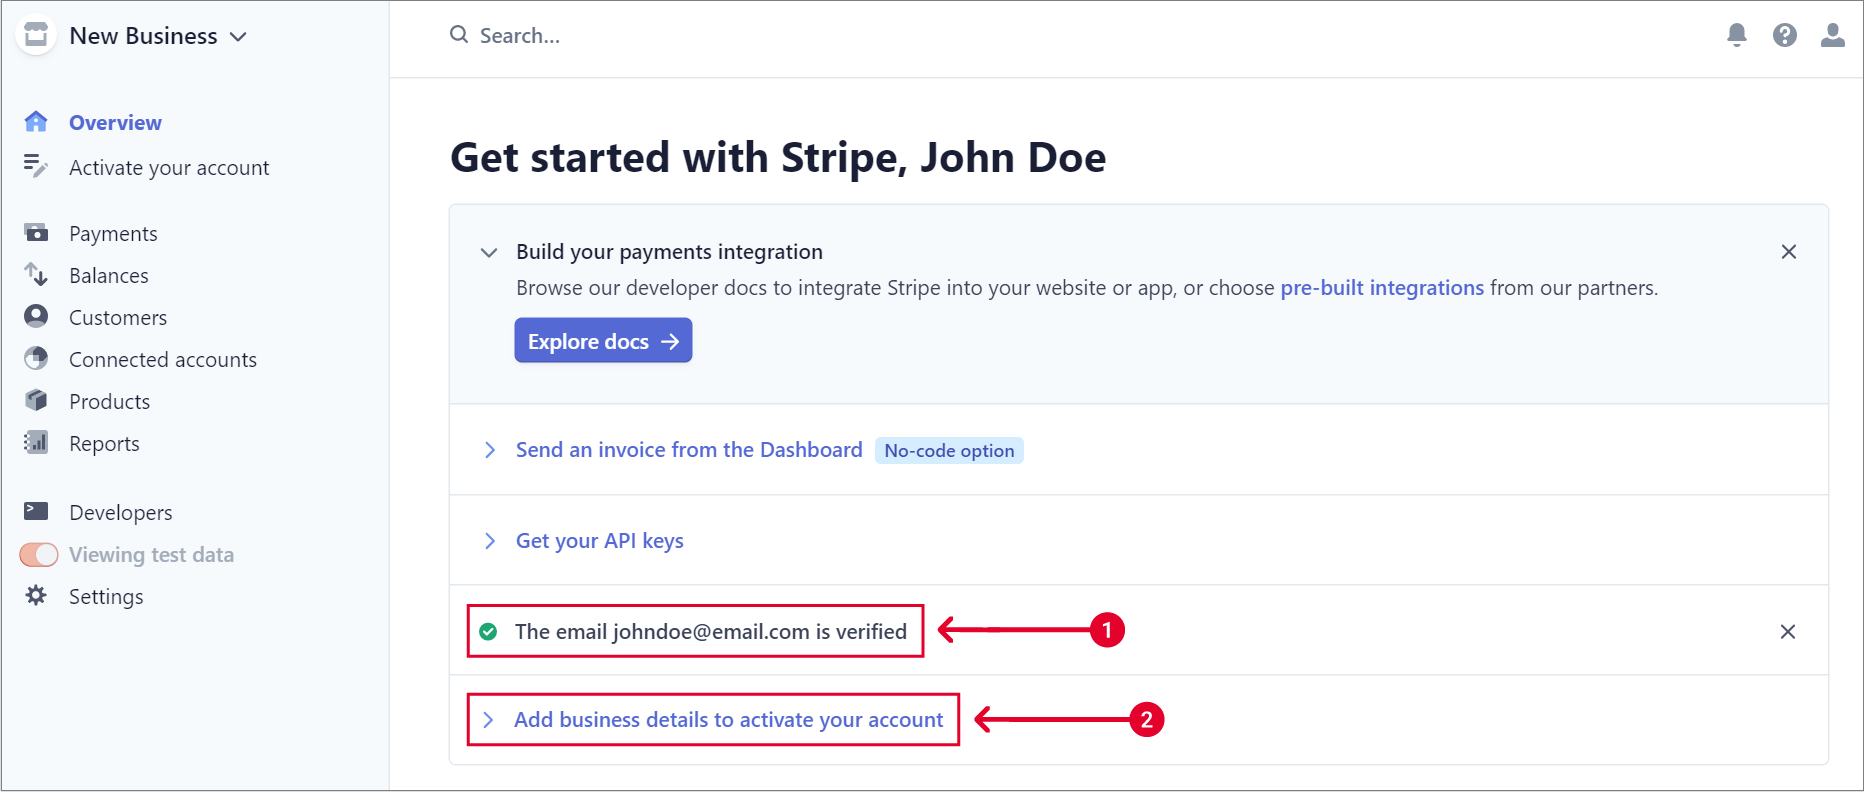
- Click on Add business details to activate your account and then click on Start now
- Now follow the steps and complete the details of your Cooperative as required by Stripe.
INFO: There is no guide for this step as the set up varies for every country and Stripe may modifiy, add or remove requirements without a specific notification. - Once you successfully activate your account you will be re-directed to your dashboard and you should see a confirmation message stating: Business details added. You will also see your business name in the top-left corner of your dashboard.
Connect your Stripe account to your CoopCycle instance
- Go to
Configuration > Settings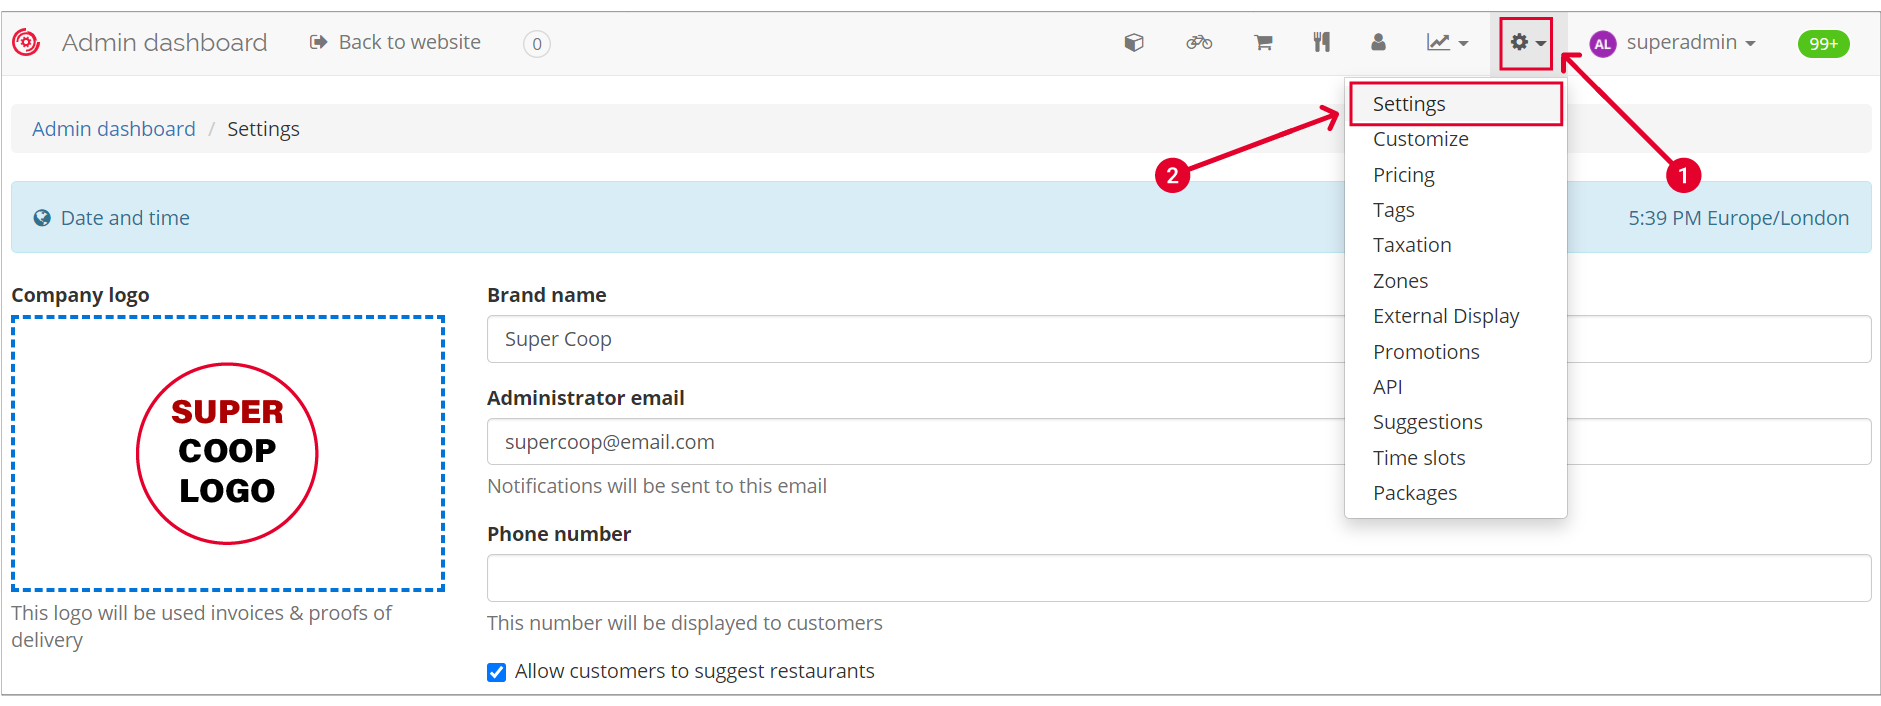
- Scroll down to Stripe Account
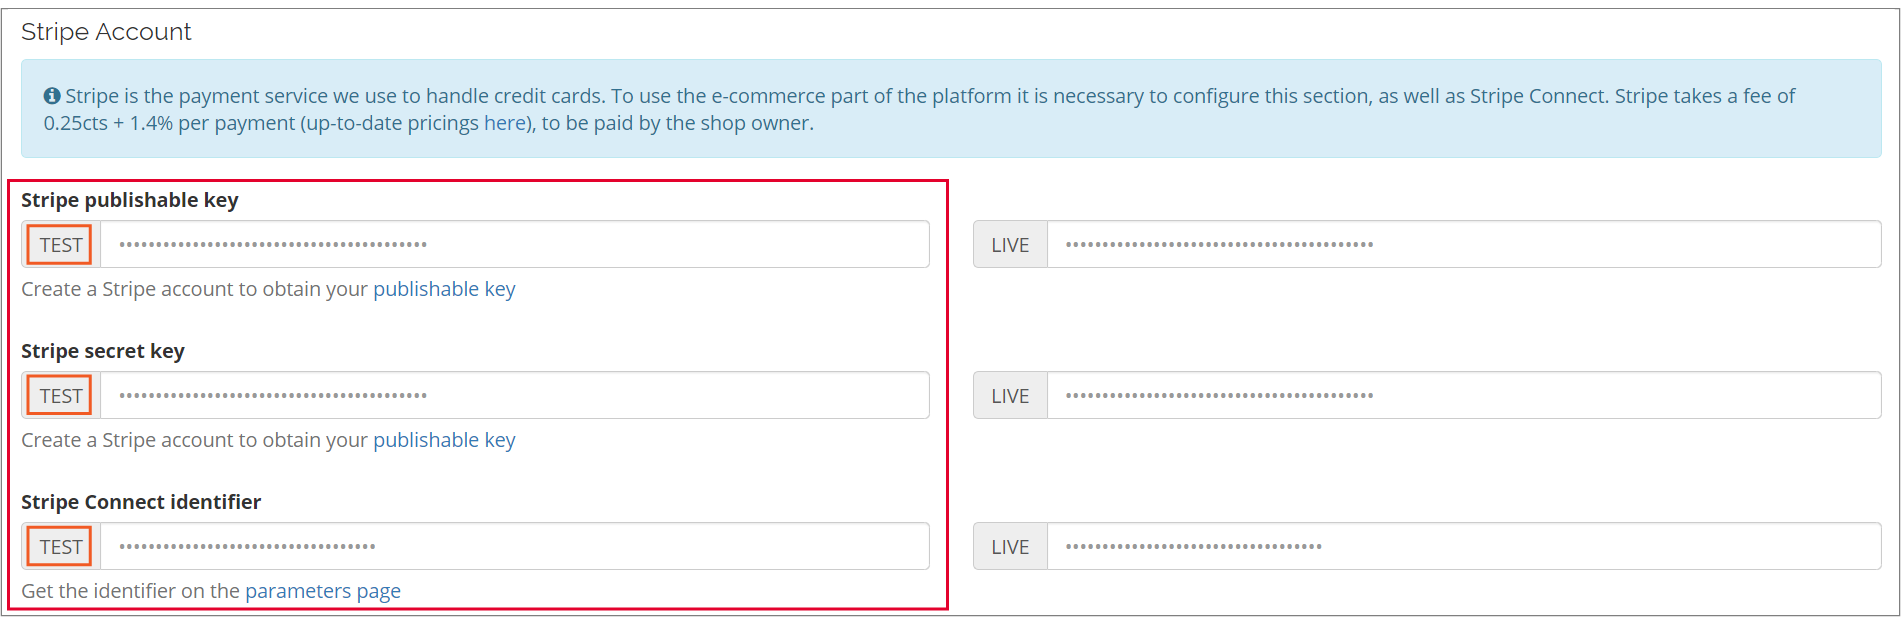
- It is important to connect Stripe in both TEST and LIVE mode
Connecting TEST mode
-
Head over to your Stripe dashboard
-
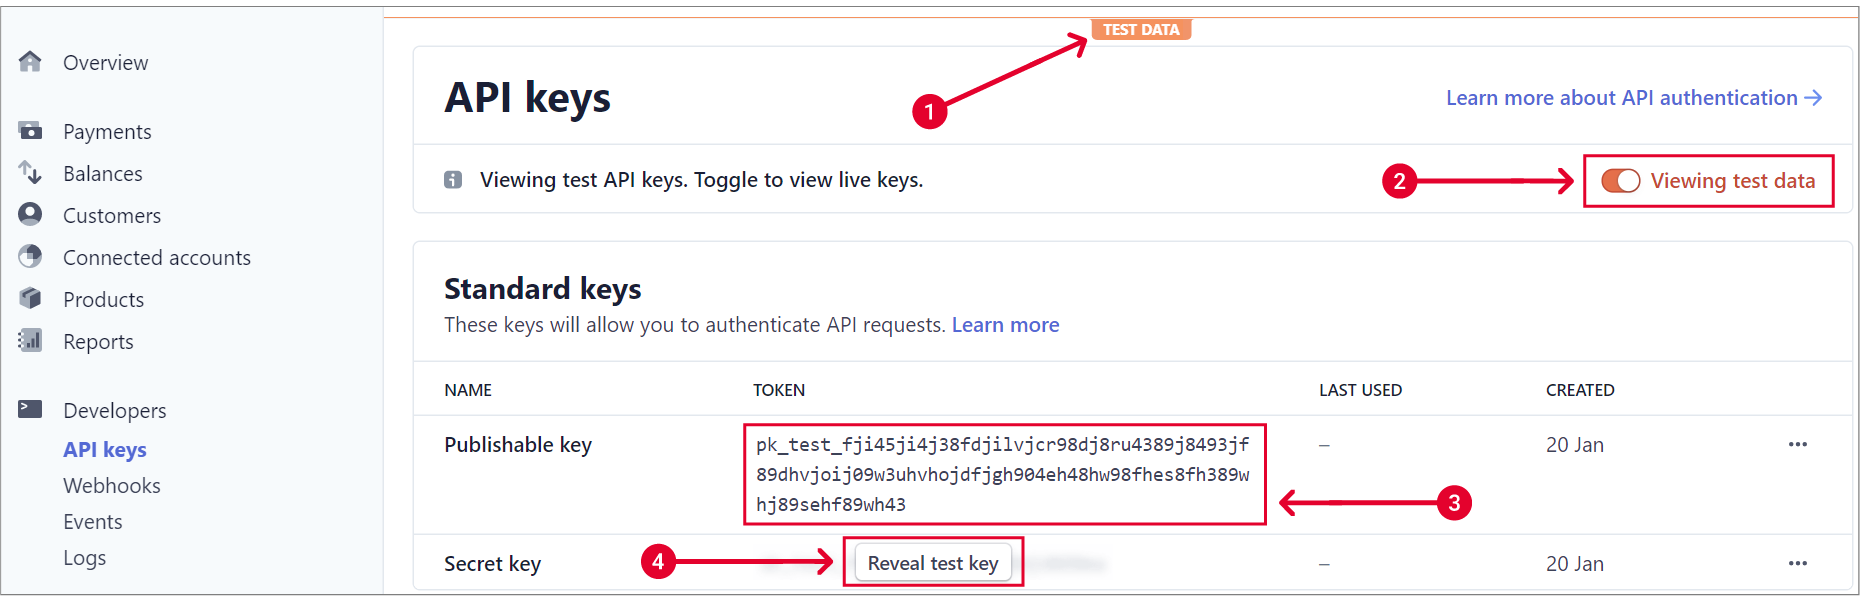
On the left-hand side panel check the View test data toggle. When toggled “ON” it turns orange and the name changes to Viewing test data

-
Click on Developers just above Viewing test data
-
Click on API keys
-
On the API keys section that opens you will see under the Standard keys heading two (2) keys: Publishable key and Secret Key. Secret key will be hidden. The keys in the image are only sample keys. Your two (2) keys will look similar to the ones in the image. Before you copy the keys, check again that you are actually in TEST mode. See nos. 1 and 2 in the image.
-
Copy the Publishable key (see no. 3 in the image) and head over to Stripe account in Settings on your CoopCycle instance and paste the key into the first field of TEST. SAVE SETTINGS
-
Head back to Stripe and next to Secret key click on Reveal test key (no. 4 in the image) and copy it into the second TEST field on your CoopCycle instance. SAVE SETTINGS
-
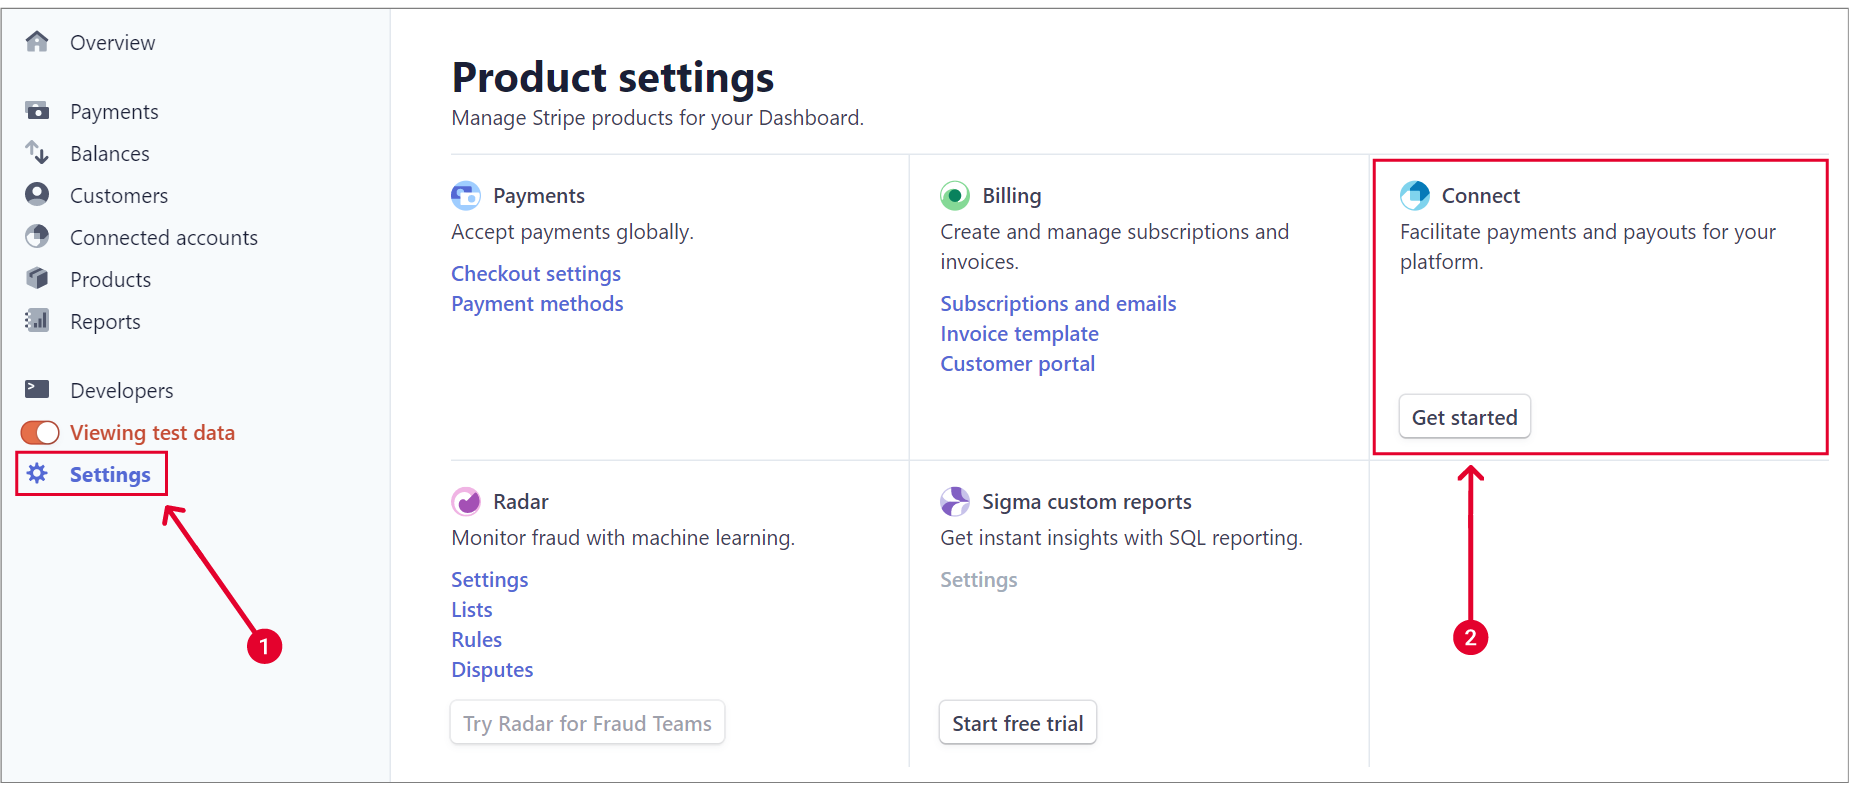
Head back to Stripe and click Settings at the bottom of the left-hand side panel.
-
In the new section that opens click Get started in the Connect block
-
A new page will load, Payments for platforms and you can click on the Get started button.
-
From the pop-up select the Platform for marketplace option and click Continue
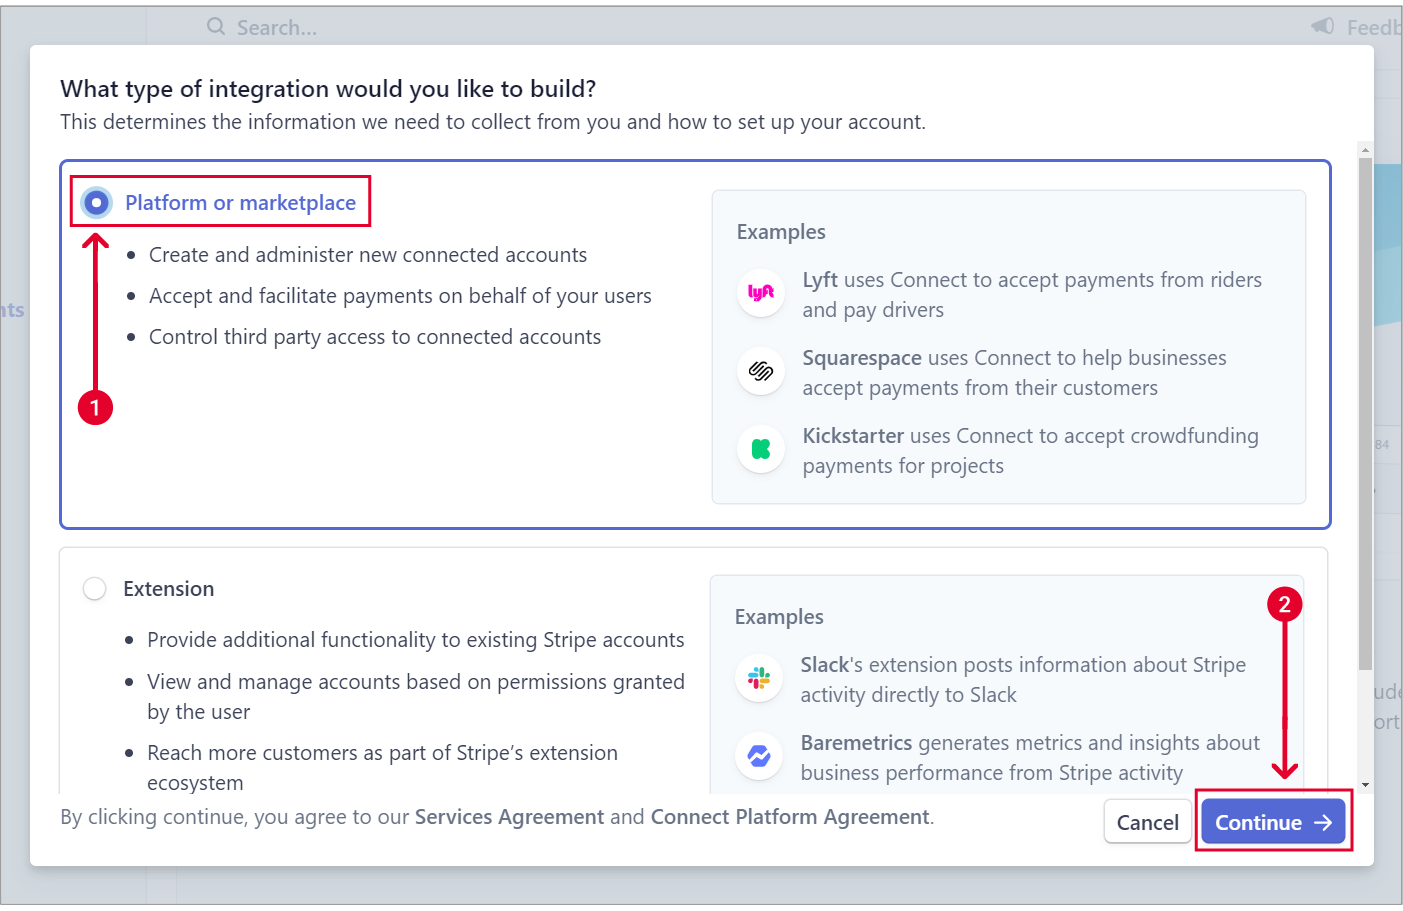 This will enable Connect settings.
 -
Click on Settings on the left-hand side panel.
-
Click on the new Settings option in the Connect block.
Connect settings
ALERT: Check if Stripe is still in TEST mode, if it’s not, enable it.
Account types
-
In Account types click Manage…
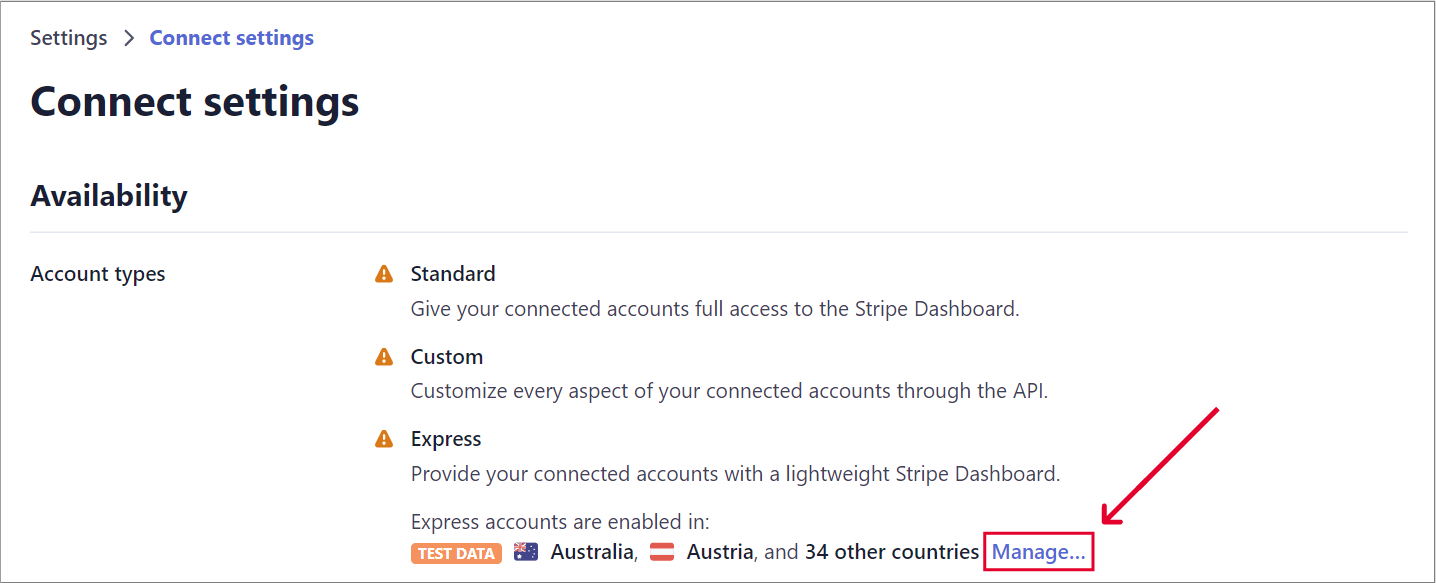
-
In section no. 1 Select countries to onboard accounts uncheck Select all and then only check ☑️ your country.

-
Section no. 2 Select capabilities for your accounts has three (3) outputs depending on the country.
OUTPUT 1:
If your country is United Kingdom you will see two (2) options in Section no. 2. Make sure you check ☑️ Card payments and Save settings.OUTPUT 2:
If your country is not United Kingdom or United States then you can skip Section no. 2 because the Card payments and transfers option is mandatory and is enabled by default.OUTPUT 3:
If your country is United States the option Card payments and transfers is mandatory and is enabled by default and you can check ☑️ the following tax reporting option according to the tax status of your Coop. Save settings.
Branding
-
Head back to Connect settings and scroll down to Branding
-
Under Business name write the name of your Coop.
-
Under Payout statement descriptor, generally, you can write an abbreviation of your Coop’s name.
Appeareance
-
Under Icon click on the round + button and upload the logo of your Coop following the recommended size.
-
Under Brand and Accent colour you can choose a colour specific to your Coop by clicking on the left end of the code beginning in hash
#using the pop-up panel or if you know the hex code of the colour of your choosing you can input it directly in the field.- Save settings.
OAuth settings
-
Scroll to the very bottom of the new opening page and toggle the option OAuth for Standard accounts

-
Under OAuth settings in the Redirects section click on the + Add URI button
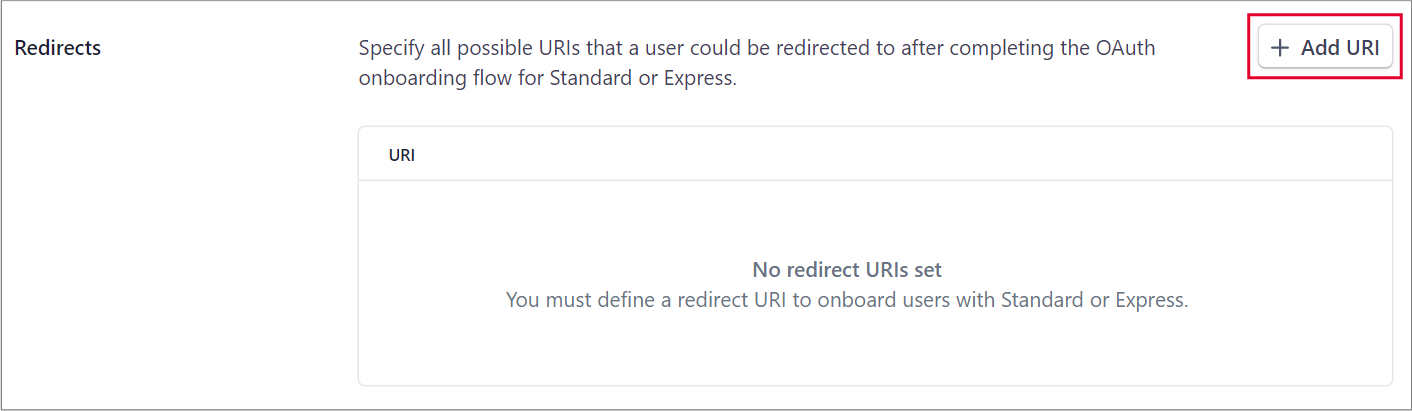
-
In the pop-up you need to write an URI address specific to your CoopCycle instance.
Sample URI address:https://xxx.coopcycle.org/stripe/connect/standard
If your CoopCycle address ishttps://supercoop.coopcycle.org/, replacexxxwithsupercoopin the Sample URI address above.
It should look like this:https://supercoop.coopcycle.org/stripe/connect/standard
Copy it in the pop-up in Stripe and click Add URI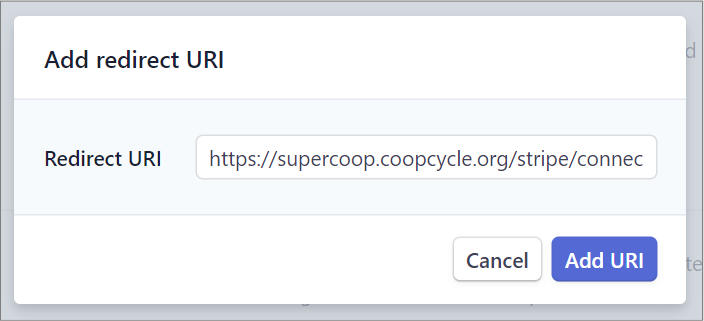


Once added you will see the URI in the Redirects section.
In the Test mode cliend ID section copy the client ID in the third TEST field (Stripe Connect Identifier) on your CoopCycle instance.
SAVE SETTINGS

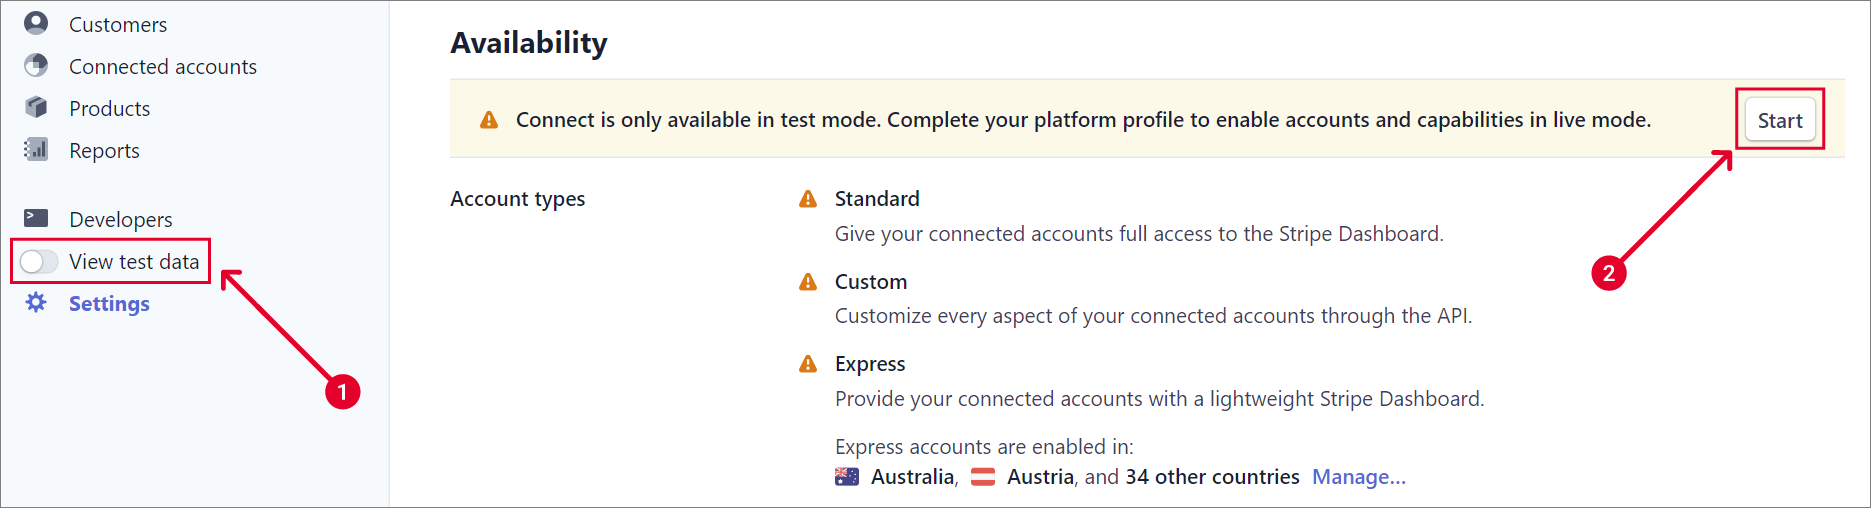
Connecting LIVE mode.
Scroll to the top of the Connect settings page.
-
While in Connect settings, toggle Viewing test data OFF so that it turns from orange to grey.
-
Under Availability click on the Start button on the right hand side of the callout text.
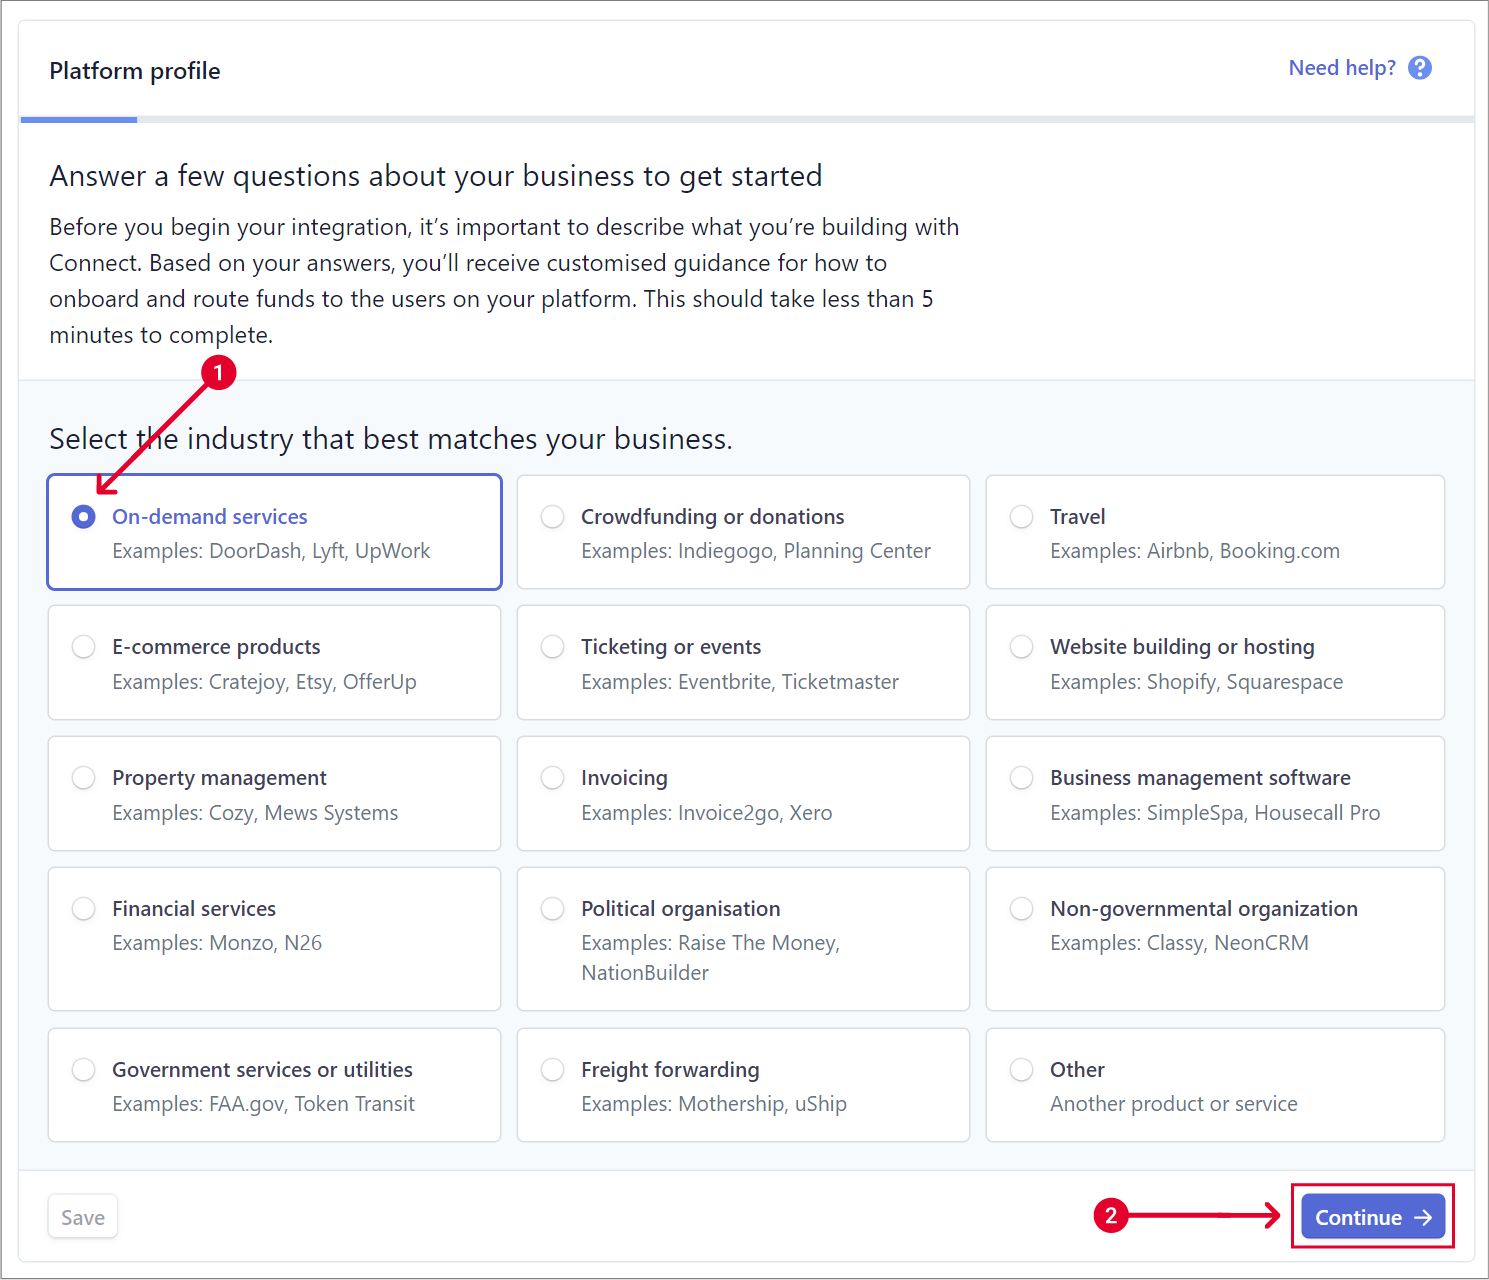
-
Select On-demand services and click Continue
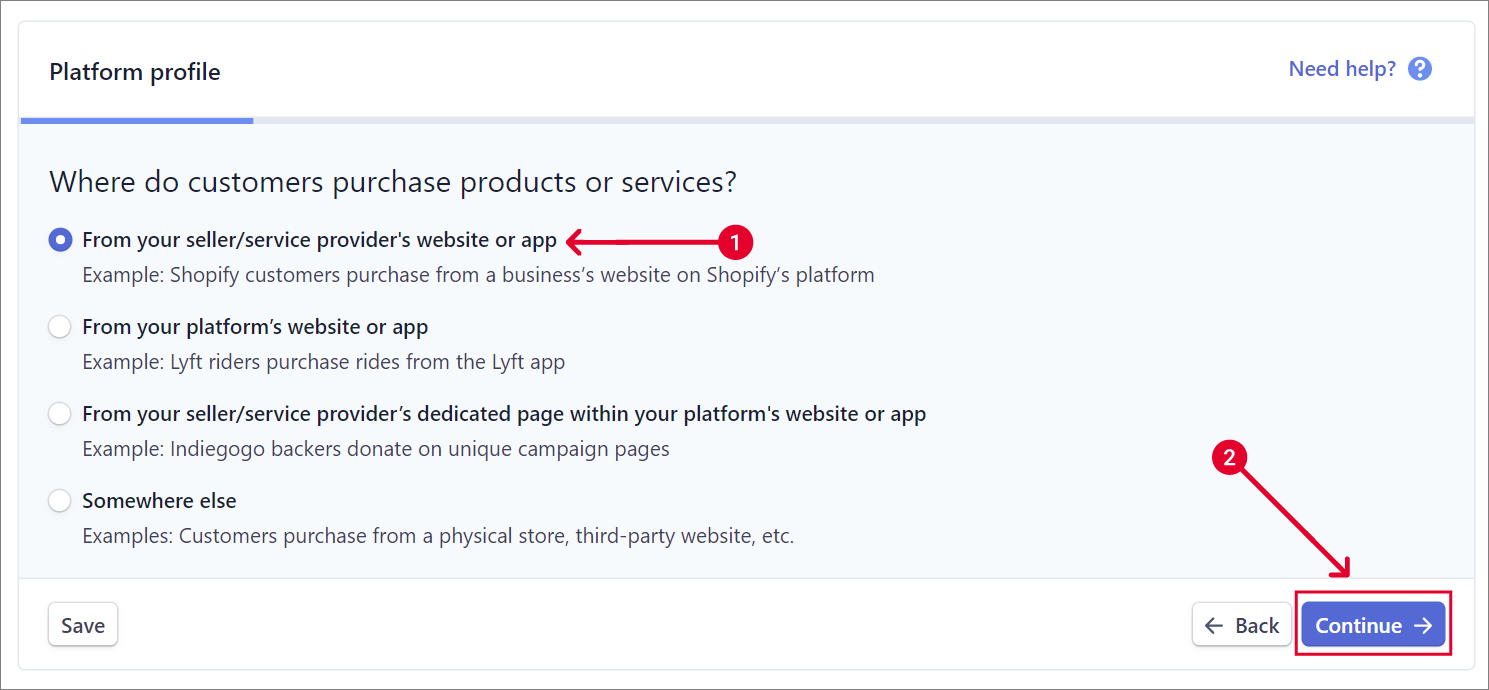
-
Select From your seller/service provider’s website or app and click Continue
-
Select the same option as in Step 4 until you reach Review your responses and click Submit
-
Now repeat the steps from TEST mode in order to configure LIVE mode.
What is the “live mode” and “test mode” of Stripe?
The CoopCycle platform can be configured to use the “live” or “test” mode from the “settings” tab. In test mode clients will not be debited. You have to use test cards (typically 4242 4242 4242 4242 4242). Don’t forget to switch to “live” mode before going into production !