General Settings
ALERT: Make sure to save your settings after each change you make.
TIP: After having clicked Create a new restaurant write the name of the restaurant, input the business address and save settings. This will enable all the General settings and also allow you to upload a restaurant logo.
General
Name public
This is how the name of the restaurant will be displayed to customers.
Type of business not-public
You will see two top-level categories, Store and Food establishment.
Any type of business selected under either category is not shown on the homepage of the Restaurant/Shop.
What Type of buiness does, is place the Business under the Store or Restaurant section on the home page of the CoopCycle platform.
Address field public
Write here the physical address of the business.
If the legal address under which the business is registered is not the same as the physical address you need to check ☑️ Use a different business address checkbox and in the Address field below write the legal address under which the business is registered.
TIP: The legal address is not shown to the customer
Description public
Write a description about the restaurant which is shown to the customer.
TIP: You can format the text with Markdown
Legal name not-public
Write here the legal name under which the business is registered. This will not be shown to the customer.
Website public
Write here the website of the business. This will be shown to the customer.
Telephone public
Write here the phone number of the business. Customers may contact the business using this number.
Options
This restaurant is exclusive
If checked ☑️ it places an Exclusive badge on the restaurant and brings it forwards on the homepage.
This restaurant is featured on homepage
If checked ☑️ it brings the restaurant forwards on the homepage.
This restaurant also accepts quotes
If checked ☑️ it allows customers to place orders without paying.
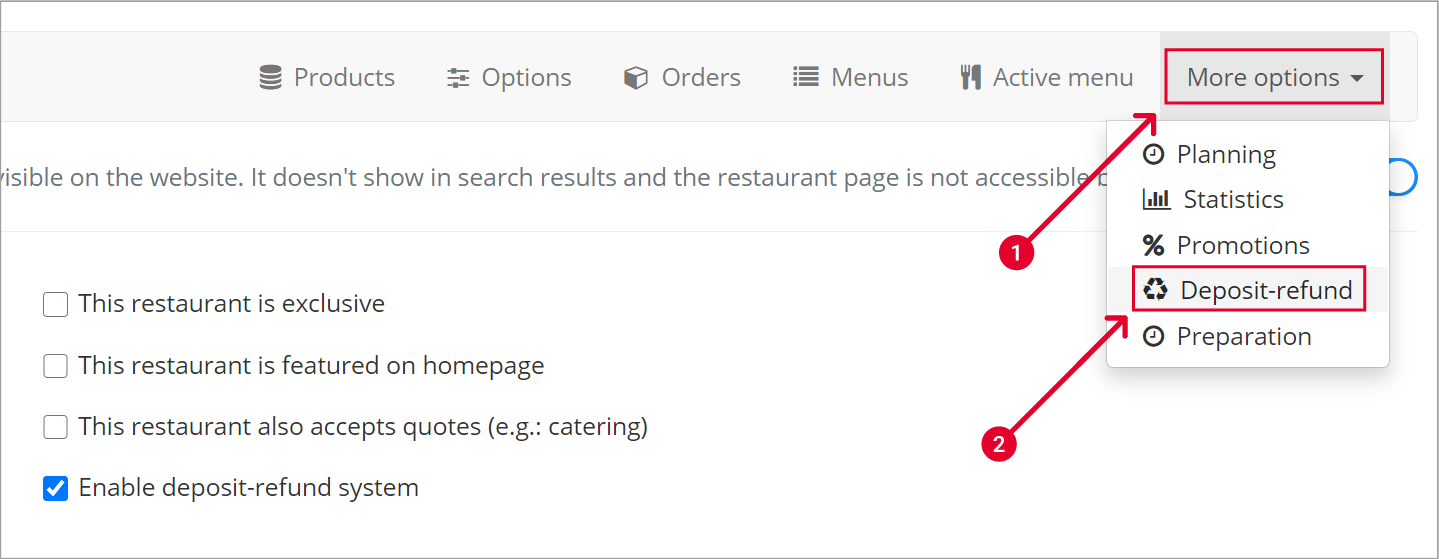
Enable desposit-refund system.
When this option is checked ☑️ you will find a new setting under More options ▼ on the restaurant Product Navigation Menu.
Automatically accept orders (Coming soon)
When this option is checked ☑️ the restaurant does not need to accept orders manually.
Fulfillment
Fulfillment methods
- Delivery - the orders placed by customers are delivered by the coop
- Collection - the order placed by customers are collected by the customers
Checking either option will enable editing the corresponding schedule section. Make sure you scroll down too see the settings for each section.
Delivery section
TIP: By unchecking either Delivery or Collection the business will have its products greyed out, respectively of each option, not allowing customers to order.
Delivery time slots
- Time slots will be displayed on the homepage of the business
- They will act as the Delivery Hours of the business.
- The overall opening hours of the business can be 09:00 to 18:00 but for deliveries they may only be open from 12:00 to 18:00.
When you’ve just created a business/restaurant from + Create a new restaurant the Delivery Time slot under Fulfillment will show no time slots. Click Add to create a new time slot.

By clicking Add a new time slot field will become available. Choose the corresponding Time and Days. See example below:
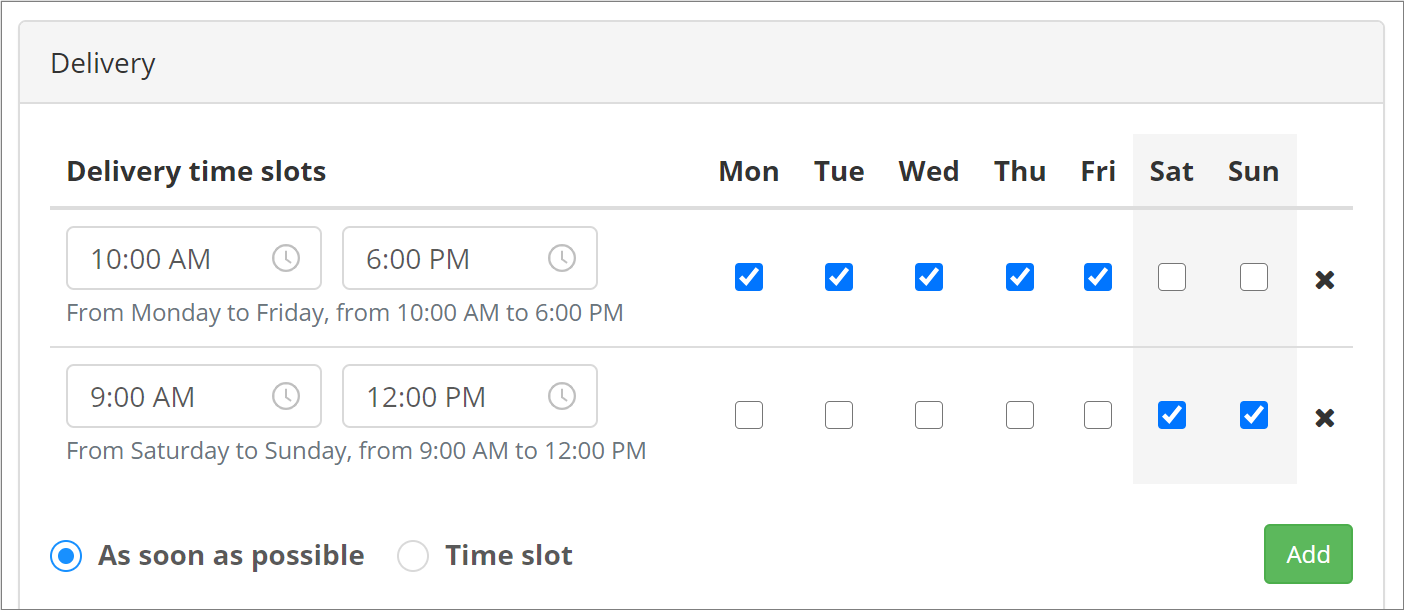
TIP: Saving settings only works if a Time Slot has a selected time and at least one (1) checked ☑️ day. See below:

If you need to remove a Time Slot click the button on the right-end of the Time Slot.

As soon as possible (ASAP)
This option works best when the delivery opening hours of the business is set in a single Time Slot. See the above image, e.g. 9:00 AM - 12:00 PM.
This option allows the customer to place an order to be delivered as quickly as possible. Go to Prepration to check how the ASAP times are configured.
See images below for ASAP delivery times examples:
| Cart | Popup |
|---|---|
 |
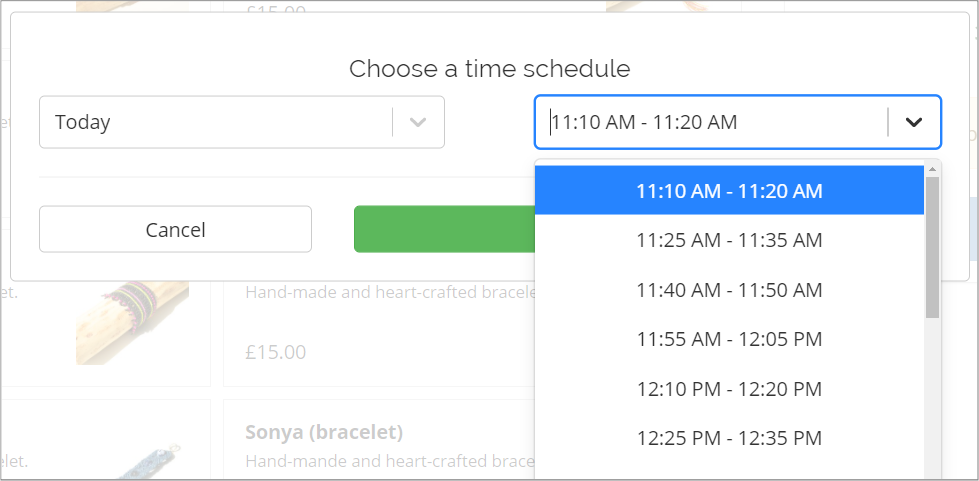 |
Time slot
This option works best when you create multiple time slots within the delivery opening hours of the business. Se image below:
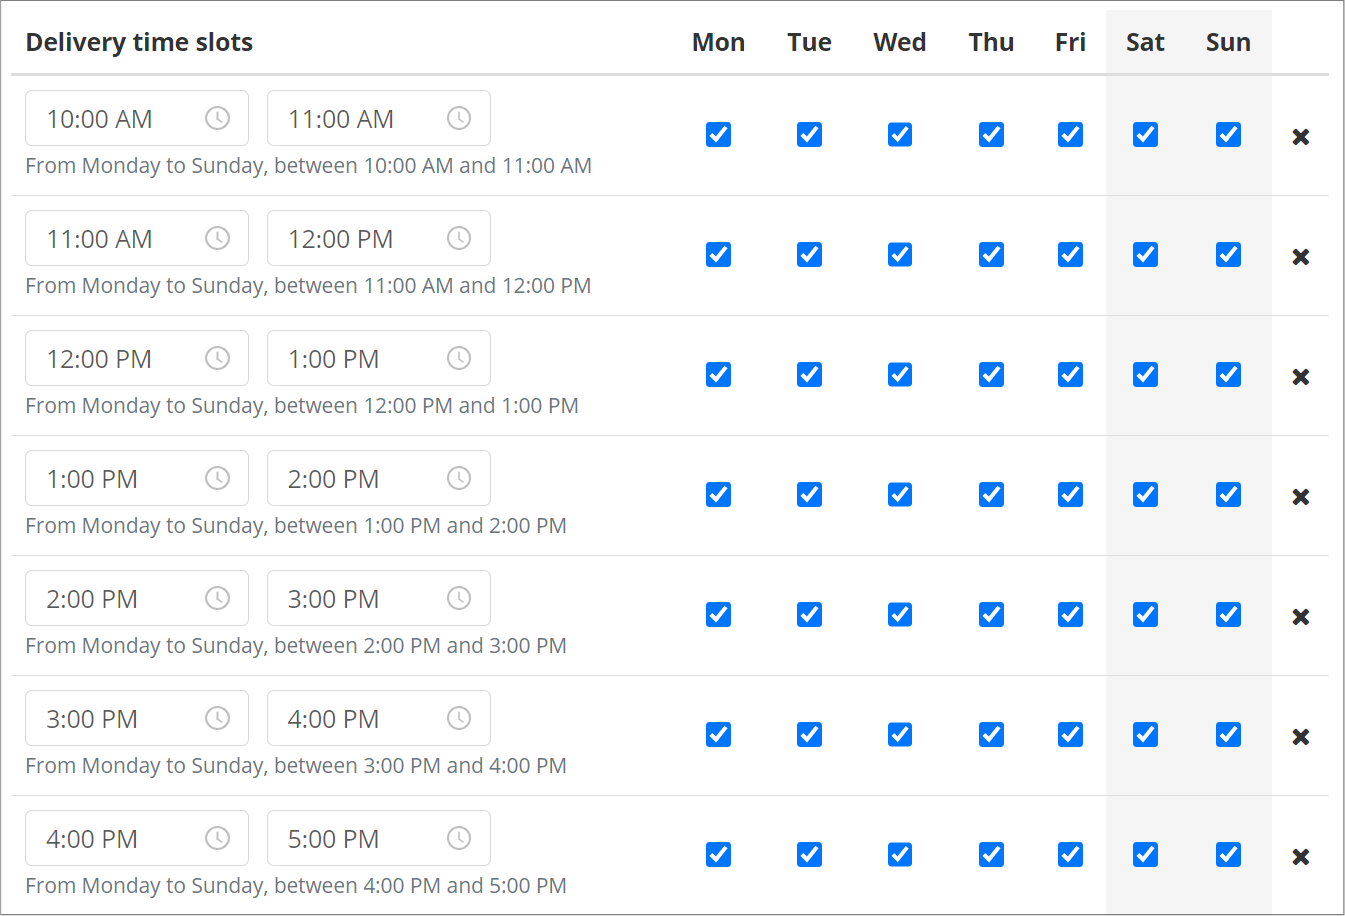
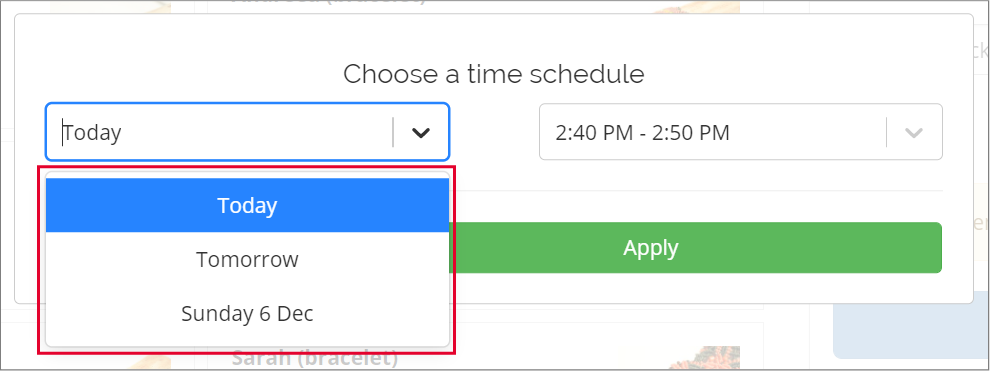
In this case, the delivery opening hours of the business are 10:00 AM - 5:00 PM. But the whole schedule has been split into hourly slots. When Time slots is selected, customers will see multiple hourly slots as delivery times. See images below (click to open full-size images in a new tab):
TIP: You don’t necessarily have to create hourly slots, you can create shorter or longer slots.
| Cart | Popup |
|---|---|
 |
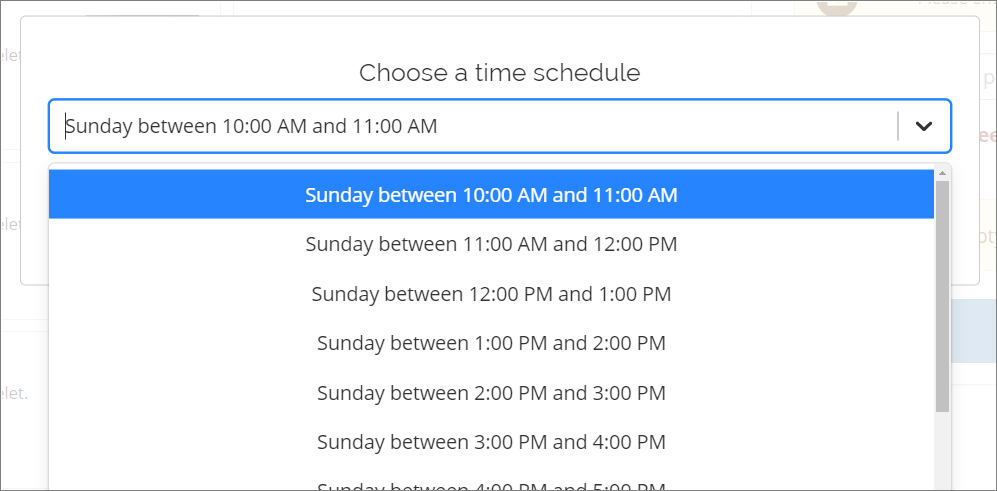 |
TIP: You can use the ASAP option with multiple slots.
WARNING: If you have one (1) slot, 09:00 AM - 6:00 PM, and you choose Time Slots, the delivery option for the customer will show up as only one time slot of 9 hours.
Allow pre-ordering
ALERT: This setting only works with the option As soon as possible selected.
When this option is checked ☑️ it allows customers to order before the delivery or collection opening time of the restaurant. Specifically the Order button on the restaurant homepage will be disabled.
Before this option was implemented, customers could always pre-order.
Allow editing
When this option is checked ☑️ it allows the business owner to edit the Delivery Time Slots.
This option is unchecked by default.
Minimum cart amount
By setting a minimum cart amount the system doesn’t allow purchases under the set amount. If minimum cart amount is £8 than only purchases that equal or are above £8 can be placed.
Additional delay before ordering
This option is one of the methods that allows pre-ordering.
When either Day(s) or Hour(s) is set with a value equal or greater than 1 the delivery time will be displayed in the future from the current time of ordering.
If Day(s) is set to 1 the first available delivery time will always be displayed as +1 day from the current day. See images below (these screenshots were taken on a Friday):
| Delay: 1 Day | Delay: 2 Days |
|---|---|
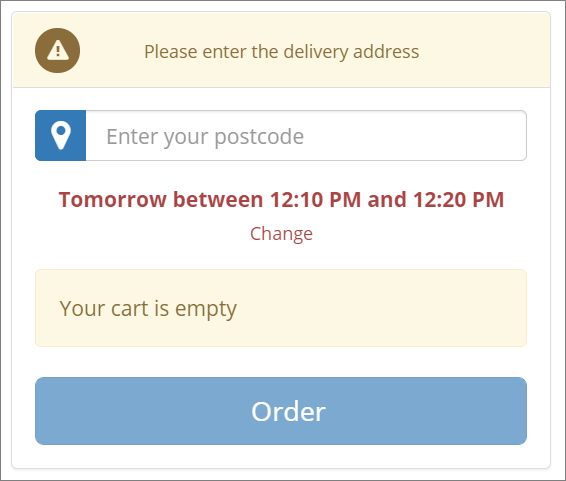 |
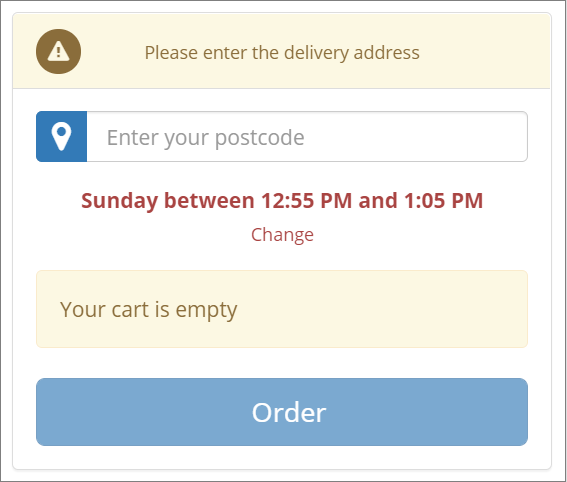 |
If Hour(s) is set to 1 the first available delivery time will always be displayed as +1 day from the current day. See images below (these screenshots were taken at 13:00. The extra time after o’clock is the delivery and preparation times):
| Delay: 1 Hour | Delay: 2 Hours |
|---|---|
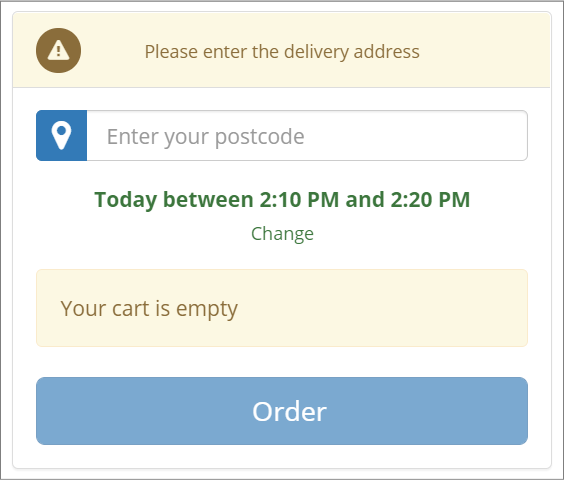 |
 |
Range duration
IMPORTANT: Range duration is used together with the option As soon as possible selected.
INFO: Range duration doesn’t apply for Collection.
Range duration specifies the time frame of a delivery on top of the Preparation time settings of the restaurant.
This setting works only for newly placed orders.
If a customer places an order at 18:00 and Range duration is set for 10 minutes the delivery slot for their order will be 18:30 - 18:40.
The Range duration is from 30 to 40 minutes and the Preparation time is from 18:00 to 18:30.
Number of shipping choices (in days)
The default value is 2. It cannot be changed to anything lower than 2.
The default value 2 means the cutomer will be presented with two delivery days (current day and the next day). If the value is 3 the customer will be presented with three (3) delivery days. See images below:
TIP: The days when the business is closed do not count towards the Number of shipping choices (in days).
| Shipping choices: 2 | Shipping choices: 3 |
|---|---|
 |
 |
Delivery perimeter
The first option has two choices, Zone and Distance.
Selecting Zone will allow you to select a zone previously configured under Zones.
Selecting Distance (km) allows you to input a value in numbers representing the radius in kilometers with the center at the address of the business.
Payment
Connect with Stripe
In the Payment section you will find two Connect with Stripe buttons. One for Test and another for Live mode. You should connect Test mode first and make Test payments to make sure the Restaurant and Stripe account of the restaurant are configured correctly.
Go to Creating a Stripe account to begin setting up the account.
To know more about Test (how to make Test payments) and Live mode go here
Allow the restaurant to manage Stripe account on its own
When enabled this option makes the Payment section visible on the restaurant’s owner account. Meaning they will be able to connect Stripe themselves. The option is disabled by default.
Settlement
- fee paid by the Customers
- fee paid by the Restaurant
- fee charged by the Coop
IMPORTANT: Enable variable amount charged by the platform and Enable variable amount paid by the customer both need to have the same option selected, either yes or no.
Contract
TIP: The following settings should be configured for both Enable variable amount paid by the customer
Selecting No
The default option is no and will allow you to use a fixed amount when charging the customer the delivery fee.
Amount charged by the platform is the fixed delivery fee that the Coop will receive (the platform being the Coop).
Amount paid by the customer is the fixed delivery fee that the Customer will pay when ordering.
There are two ways this can be configured.
Option 1:
If the Amount charged by the platform is equal to the Amount paid by the customer it means the customer gets charged a certain fee and the Coop receives that exact fee.
| Charged by the platform | Paid by the customer | Coop receives |
|---|---|---|
| 5 | 5 | 5 |
Option 2:
If the Amount charged by the platform is higher than the Amount paid by the customer it means the Restaurant pays the difference between the platform and the customer fee.
| Charged by the platform | Paid by the customer | Paid by the Restaurant | Coop receives |
|---|---|---|---|
| 5 | 2 | 3 | 5 |
TIP: This option allows for Restaurants to sponsor the Customers by offering their products at a smaller delivery fee.
Selecting Yes
Selecting yes will allow you to use a custom delivery pricing. This can be configured here.
After you’ve configured the pricing use the dropdown menu to select it. Make sure to select the same pricing under both Amount charged by the platform and Amount paid by the customer.
Platform fee for deliveries
Here you can input the percentage that the Restaurant will pay to the Coop for deliveries. The percentage is retained from the total of products per each order.
Platform fee for takeaway
Here you can input the percentage that the Restaurant will pay to the Coop for takeaway. The percentage is retained from the total of products per each order.