Dispatch
The administration dashboard (called dashboard in this document) allows you to control all the functions for creating and managing tasks as well as to manage the dispatch of couriers manually.
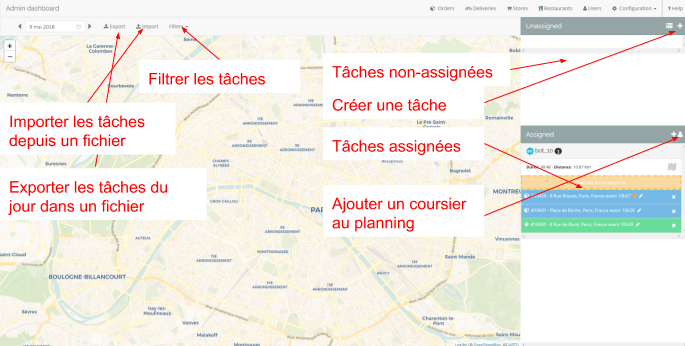
Create, assign and edit a task
A task is created by clicking on the button in the Unassigned section of the dashboard. A popup opens and allows you to configure the task. Three actions are possible for a task:
- Add, which allows you to create a task
- Edit, which allows you to change or check the status and history of a task
- Finish the task, which allows the status change of the task by: - To Do - Success - Failure
As long as a task is not assigned to a courier, the latter remains in the Unassigned section.
Add / Create a task
The following information is available to create a task:
- Checkbox: type of task
- Pickup
- DropOff
- Field: address of drop-off or pick-up point
+: more options- Field: Postal code (automatic filling)
- Field: City (automatic filling)
- Field: Floor
- Field: instructions
- Dropdown: niche of achievement
- Start date
- End date
- Dropdown: choose a tag
Edit a task
The same information as “add” is available for editing. In addition to this it is possible:
- Dropdown: Assign a courier
- Dropdown: See history
Complete a task
To complete a task, just click on the “Finish task” button at the top right of the popup window. The available features are:
- Dropdown: “to do”, “failed”, “successful”
- Field: Comment on the completion of the task
See the courier connected on the dashboard
When a courier connects to the application and its location is activated, a marker indicating its position is displayed on the dashboard.
Add a courier to the Assigned section.
Adding a courier to the schedule means that he is available to be assigned to tasks and therefore to deliver orders. In order to add a courier to the schedule, click on the + button in the Assigned section.
Assign a task to a courier.
If it is possible to assign a courier to a task from the popup for creating or editing a task, it is much more convenient to use the drag’n drop function of the dashboard: drop the task directly in the courier assignment area.
Create task
The task appears in the Unassigned section.
The dispatcher moves the task to a courier previously added to the schedule.
Get information from an order
As soon as two tasks are assigned to a courier, a delivery is created. Several information is available:
- Estimated duration of delivery;
- The distance to be covered (relative to the route of the route) (“Map” button: Show / hide the delivery route, which is the route proposed to the courier for delivery)
Assign tasks to a courier considering optimization
The dispatcher can optimize the delivery route of the courier by moving the races in the task stack which are assigned to the latter. In order, the first in the stack will be the first route point taken into account and so on until the end of the stack. The dispatcher can move the tasks in the stack to re-organize them.
Create a tag and tag a task
Tags are values that can be assigned to a task in order to sort them in the dashboard. A tag is made up of a title and a color. In order to assign a tag to a task, you must first create the tags that the dispatcher needs.
- Go to the configuration panel, “Tag” section;
- Create a tag by clicking on the “Create a new tag” button;
- Give a name and a color to the tag;
- Validate.
In the dashboard, the dispatcher will find the tags by creating a task or by editing it.
- Click on the button
Add a tag(toothed wheel); - Add the tag; It is possible to assign multiple tags to a task.
Manipulate the different filters
Different filters are applicable in order to display only certain tasks. It is possible to filter by:
- Task status:
- Completed tasks
- Untagged tasks
- By tag
It is possible to combine the filters.
Dropdown calendar : change the date
To change the day, just use the drop-down calendar to the left of the top bar of the dashboard.
Import tasks from a CSV file
To avoid manually creating a large number of tasks, it is possible to mass import them via a CSV file. On the dashboard, click on the Import button: a window opens to allow you to upload a file. You must at least specify an address for each task, the other columns are optional. To import a file, click on the `Import ‘button located on the top bar of the dashboard.
The before and after columns to specify the time slot accept values in different formats. Here are the values of the columns accompanied by an example:
- type
- address.name
- address.telephone
- address
- adress.floor
- address.description
- after
- before
- comments
- tags
You can download a sample file.
Export tasks in a CSV file
To export a list of tasks you have to provide a date range. You will receive a download of all tasks in that range.