Courier APP
Log in
See Log in.
Main screen
| Main screen | |
|---|---|
| 1 App menu 2 User account role 3 App settings 4 Date picker 5 Map screen 6 Task list screen 7 Map |
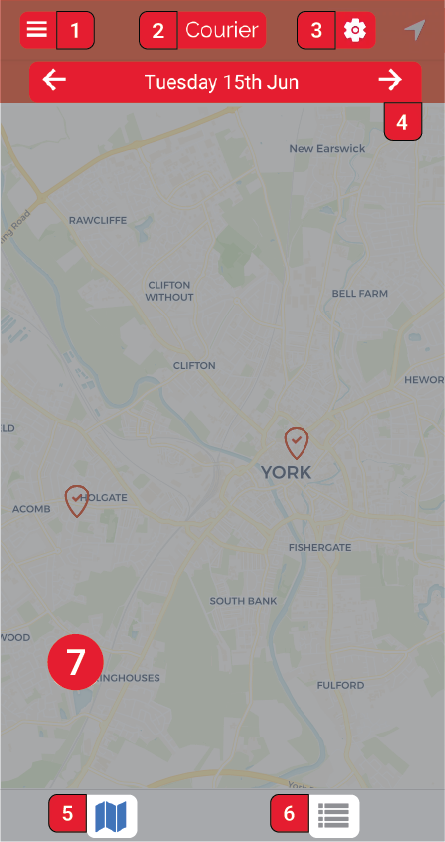 . . |
1 App menu
Here you can find:
User account settings, Log in and Sign out.
Find restaurants…: the list of Restaurants/Shops where you can order from.
Tasks is where you go to see the available tasks (orders and deliveries) to do. Clicking on Tasks takes you to the Main screen.
Bottom of the menu screen:
- The name of Coop is displayed. Clicking on it will display an “About us” page. To add or edit content please contact the developer at dev[at]coopcycle[dot]org.
- The Coop email is displayed. This is the email set up in Setting on the Platform website.
- Version number of the App.
2 User account role
This simply displays the role your user account. If your user account has multiple roles, the role would change depending on where you navigate within the app.
3 App settings
Tasks
Hide done tasks hides on the map the tasks that have been completed.
Hide failed tasks hides on the map the tasks that have been cancelled or refused.
Hide done tasks hides on the map the tasks that have been completed.
Tasks changed alert sound if enabled the app will notify when a tasks has been modified. If disabled notification will only happen for new assigned tasks.
Settings
Signature screen as default if enabled it displays the Signature screen when completing a task after clicking on Add a proof of delivery . If disabled the Camera opens instead of the Signature screen.
4 Date picker
Clicking on the date it displays the calendar where you can navigate to any date you need. Clicking on the left and right arrows it displays tasks from the previous or next date based on the date you’re on currently.
5 Map screen
This is the default screen when opening the app. The icon at the bottom if blue indicates you’re on the Map screen.. Here you can see all available tasks as pins on the map. Completed tasks will be displayed as greyed out pins.
Tasks (pins) depending on the number of tasks and the zoom level of the map are automatically bundled together in Clusters. A cluster is a solid grey pin with a number on it indicating the number of tasks contained in the cluster. Clicking on the cluster
6 Task list screen
This screen allows yo to see all the available tasks in list form. To select the Task list screen click on icon next to the map icon.
INFO: Each Task when opened displays a mini-map.
7 Map
This is the map on the Main screen where you can see all the available tasks.
Complete an Order or Delivery
| From the Map screen | From the Task list screen |
|---|---|
| 1. Click on the desired Task (pin) on the map 2. Click on the Task from the pop-up 3. Swipe Right on the Complete button at the bottom 4. Click the button. 5. If needed, add a note and proof of delivery see here 6. Click Validate |
1. Swipe Right on the desired Task 2. Click the button. 3. If needed, add a note and proof of delivery see here 4. Click Validate |
 |
 |
Start a Task
Starting a task records the time you started a task. It is used to indicate when a Courier is on they way towards a pickup or a dropoff. Starting a task is useful for the Dispatcher to know at what stage in an Order or Delivery the Courier is located.
Start a Task can only be selected from the Map screen after. See the first instuction GIF above.
Add proof of delivery
Before completing a task, at the bottom of the screen you’ll find the Add a proof of delivery button.
 .
.
Add name of the recipent customer
Here you can change the name of the customer that received the parcel before you complete the delivery.
Cancel or Refuse a Task
| From the Map screen | From the Task list screen |
|---|---|
| 1. Click on the desired Task (pin) on the map 2. Click on the Task from the pop-up 3. Swipe Left on the Complete button at the bottom 4. Click the button. 5. If needed, add a note and proof of failed delivery see here 6. Click Mark task as failed |
1. Swipe Right on the desired Task 2. Click the button. 3. If needed, add a note and proof of delivery see here 4. Click Mark task as failed |
 |
 |